

CODESYS on a Raspberry Pi: install, licence and a first program
Install CODESYS Control for Raspberry Pi SL with Deploy Control SL, choose SL, MC SL or 64 SL, understand the two-hour demo and run a first program.
By the LADX engineering team
Short answer
Install the CODESYS Development System and the CODESYS Control for Raspberry Pi SL package on your PC, enable SSH on the Pi, then use Tools > Deploy Control SL to connect and install the runtime. Without a licence it runs for two hours and then needs a manual restart. The product is for private, test and teaching use; commercial use is not permitted.
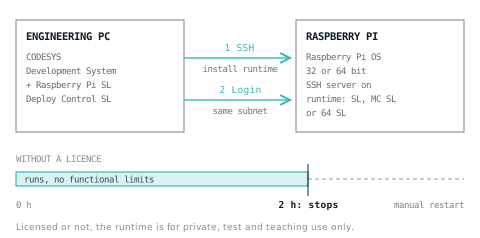
A Raspberry Pi running the CODESYS runtime is a real IEC 61131-3 controller. You program it from the CODESYS Development System like any other CODESYS target, and the runtime package includes Modbus TCP and serial, EtherNet/IP, PROFINET, EtherCAT, CANopen and J1939 stacks, a full WebVisu and an OPC UA server. It is the cheapest way to learn CODESYS on hardware.
It is not a licence to build machines, and the install has changed enough over the years that many guides describe menus that no longer exist. This one follows the CODESYS Store page and the CODESYS online help as they stood in October 2026, for runtime version 4.22.0.0, released on 17 August 2026.
What you need
| Item | Requirement |
|---|---|
| Raspberry Pi | Any model, according to the store page; which runtime depends on the model, below |
| Operating system | Raspberry Pi OS, 32-bit or 64-bit, with the SSH server enabled |
| SD card | 4 GB minimum |
| Network | A LAN or WLAN interface is required, which the store singles out for the Compute Module and the Pi Zero |
| PC software | CODESYS Development System V3.5.17.0 or later, the CODESYS Control for Raspberry Pi SL package and the CODESYS Control SL Deploy Tool |
| Licence | None for the two-hour demo; a single-device licence to run continuously |
SL, MC SL or 64 SL: which runtime
The package contains three runtimes. When you install, Deploy Control SL detects the Pi's hardware and operating system and picks the matching binary; you can change it later on the Operation tab, and the tool will not let you choose an incompatible one. From the CODESYS help:
| Runtime | CPU architecture | Raspberry Pi models | OS image |
|---|---|---|---|
| CODESYS Control for Raspberry Pi SL | 32-bit ARM, armv6l | Pi 1 A, A+, B, B+; Pi 2 B; Pi 3 A+, B, B+; Pi 4; Pi 5; Revolution Pi; CM 1, CM 3 and 3+, CM 4, CM 5 | 32-bit only |
| CODESYS Control for Raspberry Pi MC SL | 32-bit ARM multicore, armv7l | Pi 2 B; Pi 3 A+, B, B+; Pi 4; Pi 5; Revolution Pi; CM 3 and 3+, CM 4, CM 5 | 32-bit only |
| CODESYS Control for Raspberry Pi 64 SL | 64-bit ARM, single and multicore, armv8l or aarch64 | Pi 3 A+, B, B+; Pi 4; Pi 5; Revolution Pi; CM 3 and 3+, CM 4, CM 5 | 64-bit only |
In the project there is a single device description for 64-bit systems, and whether its multicore functions are enabled depends on the licence. Each licence from CODESYS Store International lets you use either the 32-bit or the 64-bit application. The Pi Zero does not appear in the help's table, although the store page mentions it.
Two version facts from the store's history save debugging time: the full 64-bit runtime arrived in 4.10.0.0, and Raspberry Pi 5 support in 4.11.0.0. An old package on a new Pi is the first thing to rule out.
Prepare the Pi
- Write Raspberry Pi OS to the card following Raspberry Pi's own instructions, and boot it.
- Enable the SSH server and check it is running. The CODESYS help gives these commands; the status should show active (running).
sudo systemctl enable ssh
sudo systemctl status ssh- Find the Pi's address with
ip a son the Pi, or leave it to the scan in the Deploy tool. - Optionally run
sudo raspi-configto expand the file system or give the Pi a unique host name. - If you will use I2C, SPI or 1-Wire devices, the help says to make sure these lines are present and not commented out in /boot/config.txt:
dtparam=i2c_arm=on
dtparam=spi=on
dtoverlay=w1-gpio-pullup,pullup=1
Install the runtime with Deploy Control SL
- In the CODESYS Development System, open Tools > CODESYS Installer, choose Browse under Add-ons and install the CODESYS Control for Raspberry Pi SL package. That brings the runtime package, libraries, device descriptions and sample projects onto the PC. The help lists the CODESYS Control SL Deploy Tool as the other package you need.
- Open Tools > Deploy Control SL. On the Communication tab, enter the Pi's IP address or click Scan, set the SSH port, and log in with the user name and password you set when you imaged the card, or with a public key. The help's table of default credentials still lists pi and raspberry.
- On the Deployment tab, choose the product and version and click Install. The runtime is installed and the controller restarts by itself.
- On the Operation tab, check the runtime is running; Start Selected starts it if it is not.
Older guides, including the community wiki on CODESYS Forge, describe a Tools > Update Raspberry Pi command. The current help uses Tools > Deploy Control SL, and the store's version history records a reworked SL Deploy Tool in 4.14.0.0. If your menus do not match a tutorial, check the tutorial's date before you check your installation.
The licence and the two-hour limit
Without a licence the runtime runs for two hours without functional limitations and then shuts down. A manual restart is needed to continue.
Everything else the store page says about licensing, in short:
- Use. The combination of a Raspberry Pi and a CODESYS runtime is for private use, test and teaching. Commercial use is not permitted; for a device used commercially, the store points to application-based licences.
- Where it may run. Not released for containers or virtual machines.
- Licence type. A single-device licence. It is activated into a soft container that is permanently tied to the controller, or onto a CODESYS Key USB dongle, which can be moved to another controller by plugging it in there.
- Price. EUR 55 plus VAT on CODESYS Store International at the time of writing (October 2026). Technical support is not included; it is sold separately as a support ticket.
To activate a licence, the help's procedure is: create a standard project, update the device in the device tree, open Tools > License Manager, choose Device and then Dongle or Soft Container, select the Pi, choose Install Licenses, then Activate License and enter the ticket ID. The PC needs internet access and a connection to the Pi. A soft-container licence is locked to that device at activation, so decide whether a dongle suits you better before you activate. Since 4.13.0.0 the runtime also supports network licensing through the CODESYS License Server for Linux SL.
The two-hour limit matters in one practical way: when the runtime shuts down, nothing wired to the Pi is being controlled any more. Do not leave a demo runtime in charge of anything that has to keep running.
A first program
The help's first test is a counter. Choose File > New Project > Standard Project, pick the Raspberry Pi device that matches the runtime you installed, and CODESYS creates an application with a PLC_PRG program called by a task named MainTask.
PROGRAM PLC_PRG
VAR
  iCount : INT;
END_VAR

iCount := iCount + 1;
To download it, double-click the device in the device tree, open the Communication Settings tab, click Scan Network, select the Pi, then Online > Login, accept the download and start the application. If the counter climbs in the monitoring view, the whole toolchain works.
If the scan finds nothing, the help points to the network first: by default the connection uses UDP, so the PC and the Pi must be in the same subnet with the same network mask. It also suggests switching off Filter Network Scans by Target ID under Device > Options; if the Pi then appears, its target ID is wrong.
Something that drives an output
Next, a start/stop circuit with a seal-in, the pattern every motor starter uses:
PROGRAM PLC_PRG
VAR
  xStart : BOOL;   // momentary push button, normally open
  xStop  : BOOL;   // normally closed, TRUE while healthy
  xRun   : BOOL;   // drives a relay module
END_VAR

xRun := (xStart OR xRun) AND xStop;
The GPIO.project sample that comes with the package shows how pins are wired into a project: a GPIOs device whose editor configures the I/O image and defines which pins are inputs and which are outputs. Inputs and outputs each appear as a DWORD, and bit X holds GPIO X; the sample flashes GPIO18 as an output. Map xStart and xStop to input bits and xRun to an output bit. For the B+ and Pi 2 layout, the help says to switch from the GPIOs A/B device description to GPIOs B+/Pi2 with Update Device, and it warns that some GPIOs may be permanently assigned to other functions by loaded drivers.
Raspberry Pi's own documentation gives the GPIO levels as 0 V and 3.3 V. A 24 V push button or contactor coil needs an interface between it and the pin, such as an opto-isolated input board or a relay module, never a direct wire.
Drawing the logic first
If you think in ladder, the free LADX ladder editor lets you draw and simulate the rung scan by scan before you touch the Pi. LADX Convert, which has the same start/stop circuit among its examples, writes a program as IEC 61131-3 Structured Text, which you can paste into PLC_PRG, or as PLCopen XML for CODESYS's Import PLCopenXML command in the Project menu. It reports anything it could not translate, and its PLCopen output carries the logic as Structured Text rather than as ladder graphics, which it also states. Structured Text for ladder programmers explains the mapping.
What goes wrong
| Symptom | Likely cause | What to do |
|---|---|---|
| The program stops after about two hours | Demo mode: no licence | Restart the runtime, or license the device |
| Deploy Control SL cannot connect | SSH server not running, or the wrong IP address or port | sudo systemctl status ssh; the help assumes a known SSH port and an address you can ping |
| The product cannot be selected on the Deployment tab | The package is missing from the Development System, or the Pi fails the tool's checks | Install the add-on; the tool looks for Raspberry in the Model line of /proc/cpuinfo |
| Scan Network finds no device | PC and Pi in different subnets or with different masks | Same subnet and mask; switch off target ID filtering to diagnose |
| The 64-bit runtime will not install | A 32-bit operating system | Use SL or MC SL, or a 64-bit OS image |
| An output pin does nothing | Pin taken by a driver, or the wrong GPIO device description | Choose a free pin; select GPIOs B+/Pi2 |
| A tutorial's menu does not exist | The guide predates Deploy Control SL | Use Tools > Deploy Control SL |
When a Pi is the wrong answer
The CODESYS help is plain about it: the Raspberry Pi was developed for testing and teaching, and industrial use is not recommended. For learning CODESYS, trying a fieldbus or a home project it is good value. For a machine, the licence terms rule it out before the hardware does, and PLC or microcontroller covers what else changes. For an open-source runtime on the same board, see open source PLC options. For CODESYS on general-purpose hardware in a real system, virtual PLCs explains that route.
Sources and further reading
- CODESYS Store: CODESYS Control for Raspberry Pi SL (requirements, licence, version history)store.codesys.com
- CODESYS help: Overview of Raspberry Pi runtimescontent.helpme-codesys.com
- CODESYS help: Establishing a connection with Deploy Control SLcontent.helpme-codesys.com
- CODESYS help: Installing the runtime on the controllercontent.helpme-codesys.com
- CODESYS help: Licensing the controllercontent.helpme-codesys.com
Common questions
- Is CODESYS on a Raspberry Pi free?
- The runtime runs without a licence in demo mode, for two hours at a time with no functional limits, then stops until it is restarted. To run continuously you buy a single-device licence from the CODESYS Store: EUR 55 plus VAT at the time of writing (October 2026). Licensed or not, use is limited to private, test and teaching purposes.
- Does CODESYS support the Raspberry Pi 5?
- Yes. The CODESYS Store version history says Raspberry Pi 5 support came with runtime version 4.11.0.0, and the CODESYS help lists the Pi 5 for all three runtimes: SL on a 32-bit OS, MC SL for 32-bit multicore and 64 SL on a 64-bit OS. Install a current package rather than an old download.
- Can I use a CODESYS Raspberry Pi in a commercial machine?
- Not with this product. The CODESYS Store page says the combination of a Raspberry Pi and a CODESYS runtime is for private use, test and teaching, and that commercial use is not permitted; for a device used commercially it points to application-based licences. The CODESYS help adds that industrial use of the Pi is not recommended.
- Can the Raspberry Pi runtime run in Docker or a virtual machine?
- No. The store page states that CODESYS Control for Raspberry Pi SL is not released for use in containers or virtual machines. CODESYS has separate virtual control products that the Deploy tool manages as images and instances, but those are different products with their own licensing, not the Raspberry Pi runtime.
- Which Raspberry Pi pins can CODESYS use?
- The GPIO sample project that ships with the package exposes free GPIOs through an I/O image in which bit X of each DWORD is GPIO X. Some pins are permanently assigned to other functions by loaded drivers and are not available. The pins switch at 3.3 V, so 24 V field signals need an interface board.
Keep reading
- Platforms
CODESYS: the PLC platform you are probably already using
Hundreds of hardware brands run the same runtime underneath, which matters more than most engineers realise.
- Languages
Ladder logic to Structured Text: converters, rules and pitfalls
How a rung becomes Structured Text, the rules a converter must follow for timers, edges and latches, and the rungs that convert wrongly unless you test them.
- Platforms
Open source PLC software: what actually exists
OpenPLC, Beremiz and matiec are real and usable. Knowing what each one is for saves a lot of time.